
Every day we see a bunch of new Android applications being published on the Google Play Store, from games, to utilities, to IoT devices clients and so forth, almost every single aspect of our life can be somehow controlled with “an app”. We have smart houses, smart fitness devices and smart coffee machines … but is this stuff just smart or is it secure as well? :)
Reversing an Android application can be a (relatively) easy and fun way to answer this question, that’s why I decided to write this blog post where I’ll try to explain the basics and give you some of my “tricks” to reverse this stuff faster and more effectively.
I’m not going to go very deep into technical details, you can learn yourself how Android works, how the Dalvik VM works and so forth, this is gonna be a very basic practical guide instead of a post full of theoretical stuff but no really useful contents.
Let’s start! :)

Prerequisites
In order to follow this introduction to APK reversing there’re a few prerequisites:
- A working brain ( I don’t give this for granted anymore … ).
- An Android smartphone ( doh! ).
- You have a basic knowledge of the Java programming language (you understand it if you read it).
- You have the JRE installed on your computer.
- You have adb installed.
- You have the
Developer OptionsandUSB Debuggingenabled on your smartphone.
What is an APK?
An Android application is packaged as an APK ( Android Package ) file, which is essentially a ZIP file containing the compiled code, the resources, signature, manifest and every other file the software needs in order to run. Being it a ZIP file, we can start looking at its contents using the unzip command line utility ( or any other unarchiver you use ):
unzip application.apk -d applicationHere’s what you will find inside an APK.
/AndroidManifest.xml (file)This is the binary representation of the XML manifest file describing what permissions the application will request (keep in mind that some of the permissions might be requested at runtime by the app and not declared here), what activities ( GUIs ) are in there, what services ( stuff running in the background with no UI ) and what receivers ( classes that can receive and handle system events such as the device boot or an incoming SMS ).
Once decompiled (more on this later), it’ll look like this:
1 |
|
Keep in mind that this is the perfect starting point to isolate the application “entry points”, namely the classes you’ll reverse first in order to understand the logic of the whole software. In this case for instance, we would start inspecting the com.company.appname.MainActivity class being it declared as the main UI for the application.
/assets/* ( folder )This folder will contain application specific files, like wav files the app might need to play, custom fonts and so on. Reversing-wise it’s usually not very important, unless of course you find inside the software functional references to such files.
/res/* ( folder )All the resources, like the activities xml files, images and custom styles are stored here.
/resources.arsc ( file )This is the “index” of all the resources, long story short, at each resource file is assigned a numeric identifier that the app will use in order to identify that specific entry and the resources.arsc file maps these files to their identifiers … nothing very interesting about it.
/classes.dex ( file )This file contains the Dalvik ( the virtual machine running Android applications ) bytecode of the app, let me explain it better. An Android application is (most of the times) developed using the Java programming language. The java source files are then compiled into this bytecode which the Dalvik VM eventually will execute … pretty much what happens to normal Java programs when they’re compiled to .class files.
Long story short, this file contains the logic, that’s what we’re interested into.
Sometimes you’ll also find a classes2.dex file, this is due to the DEX format which has a limit to the number of classes you can declare inside a single dex file, at some point in history Android apps became bigger and bigger and so Google had to adapt this format, supporting a secondary .dex file where other classes can be declared.
From our perspective it doesn’t matter, the tools we’re going to use are able to detect it and append it to the decompilation pipeline.
/libs/ ( folder )Sometimes an app needs to execute native code, it can be an image processing library, a game engine or whatever. In such case, those .so ELF libraries will be found inside the libs folder, divided into architecture specific subfolders ( so the app will run on ARM, ARM64, x86, etc ).
/META-INF/ ( folder )Every Android application needs to be signed with a developer certificate in order to run on a device, even debug builds are signed by a debug certificate, the META-INF folder contains information about the files inside the APK and about the developer.
Inside this folder, you’ll usually find:
- A
MANIFEST.MFfile with the SHA-1 or SHA-256 hashes of all the files inside the APK. - A
CERT.SFfile, pretty much like the MANIFEST.MF, but signed with theRSAkey. - A
CERT.RSAfile which contains the developer public key used to sign theCERT.SFfile and digests.
Those files are very important in order to guarantee the APK integrity and the ownership of the code. Sometimes inspecting such signature can be very handy to determine who really developed a given APK. If you want to get information about the developer, you can use the openssl command line utility:
openssl pkcs7 -in /path/to/extracted/apk/META-INF/CERT.RSA -inform DER -printThis will print an output like:
PKCS7:
  type: pkcs7-signedData (1.2.840.113549.1.7.2)
  d.sign:
    version: 1
    md_algs:
        algorithm: sha1 (1.3.14.3.2.26)
        parameter: NULL
    contents:
      type: pkcs7-data (1.2.840.113549.1.7.1)
      d.data: <ABSENT>
    cert:
        cert_info:
          version: 2
          serialNumber: 10394279457707717180
          signature:
            algorithm: sha1WithRSAEncryption (1.2.840.113549.1.1.5)
            parameter: NULL
          issuer: C=TW, ST=Taiwan, L=Taipei, O=ASUS, OU=PMD, CN=ASUS AMAX Key/[email protected]
          validity:
            notBefore: Jul  8 11:39:39 2013 GMT
            notAfter: Nov 23 11:39:39 2040 GMT
          subject: C=TW, ST=Taiwan, L=Taipei, O=ASUS, OU=PMD, CN=ASUS AMAX Key/[email protected]
          key:
            algor:
              algorithm: rsaEncryption (1.2.840.113549.1.1.1)
              parameter: NULL
            public_key:  (0 unused bits)
              ...
              ...
              ...
This can be gold for us, for instance we could use this information to determine if an app was really signed by (let’s say) Google or if it was resigned, therefore modified, by a third party.
How do I get the APK of an app?
Now that we have a basic idea of what we’re supposed to find inside an APK, we need a way to actually get the APK file of the application we’re interested into. There are two ways, either you install it on your device and use adb to get it, or you use an online service to download it.
Pulling an app with ADB
First of all let’s plug our smartphone to the USB port of our computer and get a list of the installed packages and their namespaces:
adb shell pm list packagesThis will list all packages on your smartphone, once you’ve found the namespace of the package you want to reverse ( com.android.systemui in this example ), let’s see what its physical path is:
adb shell pm path com.android.systemuiFinally, we have the APK path:
package:/system/priv-app/SystemUIGoogle/SystemUIGoogle.apkLet’s pull it from the device:
adb pull /system/priv-app/SystemUIGoogle/SystemUIGoogle.apkAnd here you go, you have the APK you want to reverse!
Using an Online Service
Multiple online services are available if you don’t want to install the app on your device (for instance, if you’re reversing a malware, you want to start having the file first, then installing on a clean device only afterwards), here’s a list of the ones I use:
Keep in mind that once you download the APK from these services, it’s a good idea to check the developer certificate as previously shown in order to be 100% sure you downloaded the correct APK and not some repackaged and resigned stuff full of ads and possibly malware.
Network Analysis
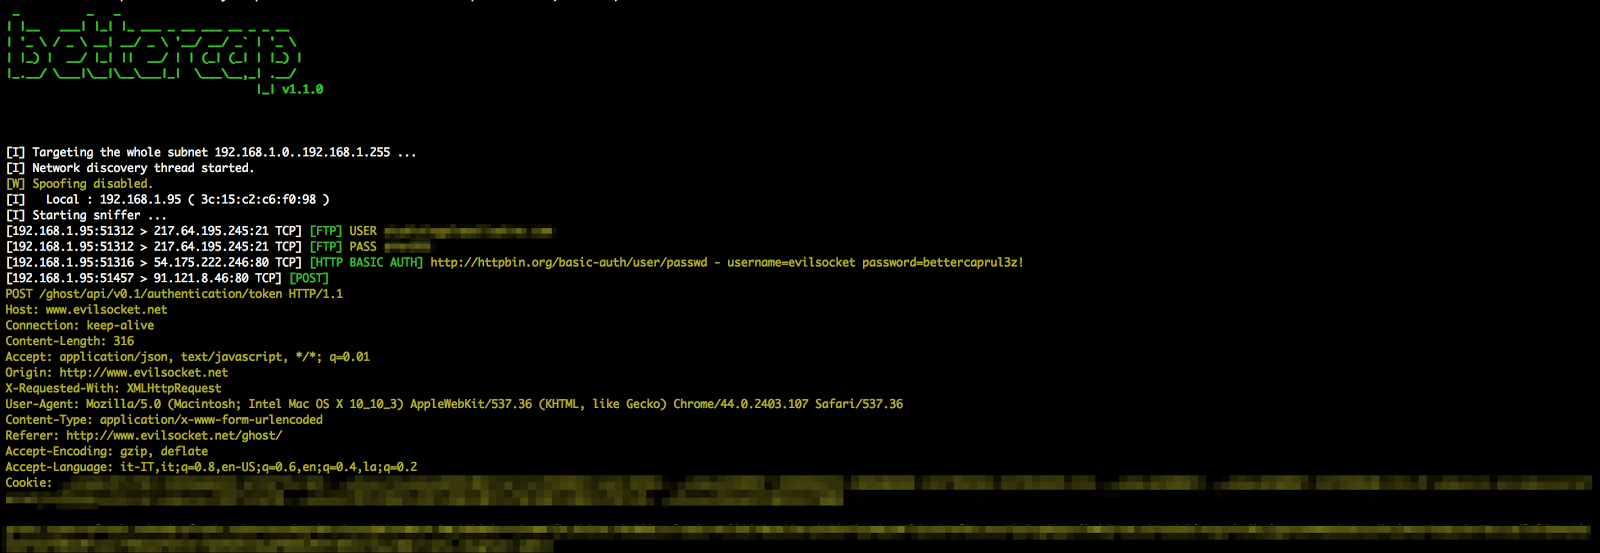
Now we start with some tests in order to understand what the app is doing while executed. My first test usually consists in inspecting the network traffic being generated by the application itself and, in order to do that, my tool of choice is bettercap … well, that’s why I developed it in the first place :P
Make sure you have bettercap installed and that both your computer and the Android device are on the same wifi network, then you can start MITM-ing the smartphone ( 192.168.1.5 in this example ) and see its traffic in realtime from the terminal:
sudo bettercap -T 192.168.1.5 -XThe -X option will enable the sniffer, as soon as you start the app you should see a bunch of HTTP and/or HTTPS servers being contacted, now you know who the app is sending the data to, let’s now see what data it is sending:
sudo bettercap -T 192.168.1.5 --proxy --proxy-https --no-sslstripThis will switch from passive sniffing mode, to proxying mode. All the HTTP and HTTPS traffic will be intercepted (and, if neeeded, modified) by bettercap.
If the app is correctly using public key pinning (as every application should) you will not be able to see its HTTPS traffic but, unfortunately, in my experience this only happens for a very small number of apps.
From now on, keep triggering actions on the app while inspecting the traffic ( you can also use Wireshark in parallel to get a PCAP capture file to inspect it later ) and after a while you should have a more or less complete idea of what protocol it’s using and for what purpose.
Static Analysis
After the network analysis, we collected a bunch of URLs and packets, we can use this information as our starting point, that’s what we will be looking for while performing static analysis on the app. “Static analysis” means that you will not execute the app now, but you’ll rather just study its code. Most of the times this is all you’ll ever need to reverse something.
There’re different tools you can use for this purpose, let’s take a look at the most popular ones.
apktool
APKTool is the very first tool you want to use, it is capable of decompiling the AndroidManifest file to its original XML format, the resources.arsc file and it will also convert the classes.dex ( and classes2.dex if present ) file to an intermediary language called SMALI, an ASM-like language used to represent the Dalvik VM opcodes as a human readable language.
It looks like:
1 | .super Ljava/lang/Object; |
But don’t worry, in most of the cases this is not the final language you’re gonna read to reverse the app ;)
Given an APK, this command line will decompile it:
apktool d application.apkOnce finished, the application folder is created and you’ll find all the output of apktool in there.
You can also use apktool to decompile an APK, modify it and then recompile it ( like i did with the Nike+ app in order to have more debug logs for instance ), but unless the other tools will fail the decompilation, it’s unlikely that you’ll need to read smali code in order to reverse the application, let’s get to the other tools now ;)
jADX
The jADX suite allows you to simply load an APK and look at its Java source code. What’s happening under the hood is that jADX is decompiling the APK to smali and then converting the smali back to Java. Needless to say, reading Java code is much easier than reading smali as I already mentioned :)
Once the APK is loaded, you’ll see a UI like this:
One of the best features of jADX is the string/symbol search ( the ![]() button ) that will allow you to search for URLs, strings, methods and whatever you want to find inside the codebase of the app.
button ) that will allow you to search for URLs, strings, methods and whatever you want to find inside the codebase of the app.
Also, there’s the Find Usage menu option, just highlight some symbol and right click on it, this feature will give you a list of every references to that symbol.
Dex2Jar and JD-Gui
Similar to jADX are the dex2jar and JD-GUI tools, once installed, you’ll use dex2jar to convert an APK to a JAR file:
/path/to/dex2jar/d2j-dex2jar.sh application.apkOnce you have the JAR file, simply open it with JD-GUI and you’ll see its Java code, pretty much like jADX:

Unfortunately JD-GUI is not as features rich as jADX, but sometimes when one tool fails you have to try another one and hope to be more lucky.
JEB
As your last resort, you can try the JEB decompiler. It’s a very good software, but unfortunately it’s not free, there’s a trial version if you want to give it a shot, here’s how it looks like:
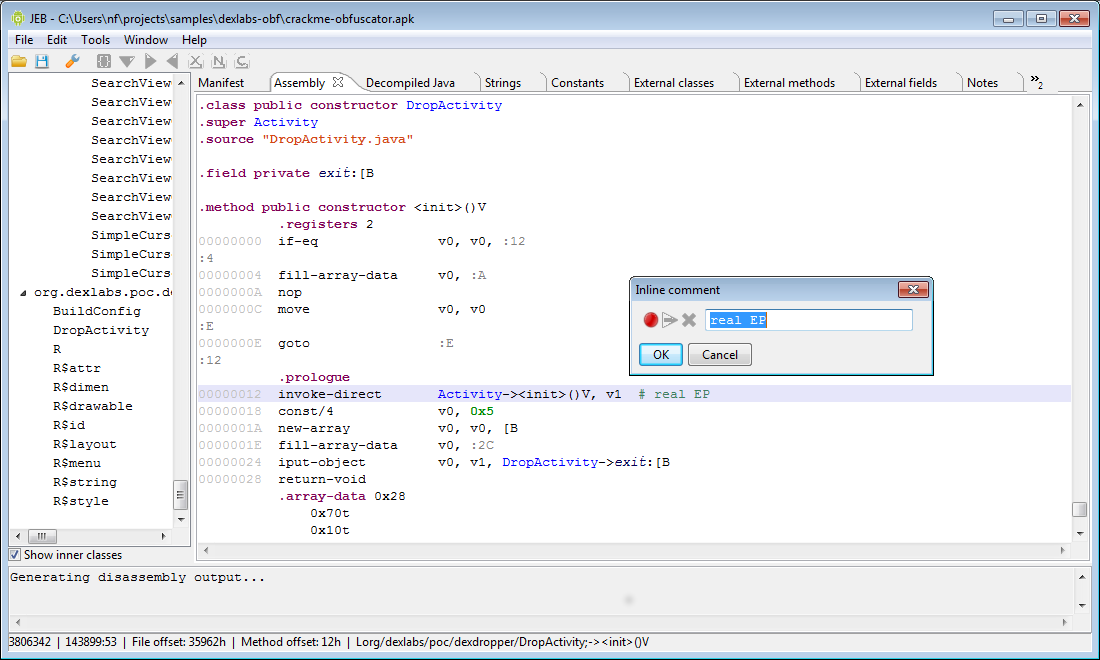
JEB also features an ARM disassembler ( useful when there’re native libraries in the APK ) and a debugger ( very useful for dynamic analysis ), but again, it’s not free and it’s not cheap.
Static Analysis of Native Binaries
As previously mentioned, sometimes you’ll find native libraries ( .so shared objects ) inside the lib folder of the APK and, while reading the Java code, you’ll find native methods declarations like the following:
1 | public native String stringFromJNI(); |
The native keyword means that the method implementation is not inside the dex file but, instead, it’s declared and executed from native code trough what is called a Java Native Interface or JNI.
Close to native methods you’ll also usually find something like this:
1 | System.loadLibrary("hello-jni"); |
Which will tell you in which native library the method is implemented. In such cases, you will need an ARM ( or x86 if there’s a x86 subfolder inside the libs folder ) disassembler in order to reverse the native object.
IDA
The very first disassembler and decompiler that every decent reverser should know about is Hex-Rays IDA which is the state of the art reversing tool for native code. Along with an IDA license, you can also buy a decompiler license, in which case IDA will also be able to rebuild pseudo C-like code from the assembly, allowing you to read an higher level representation of the library logic.
Unfortunately IDA is a very expensive software and, unless you’re reversing native stuff professionaly, it’s really not worth spending all those money for a single tool … warez … ehm … :P
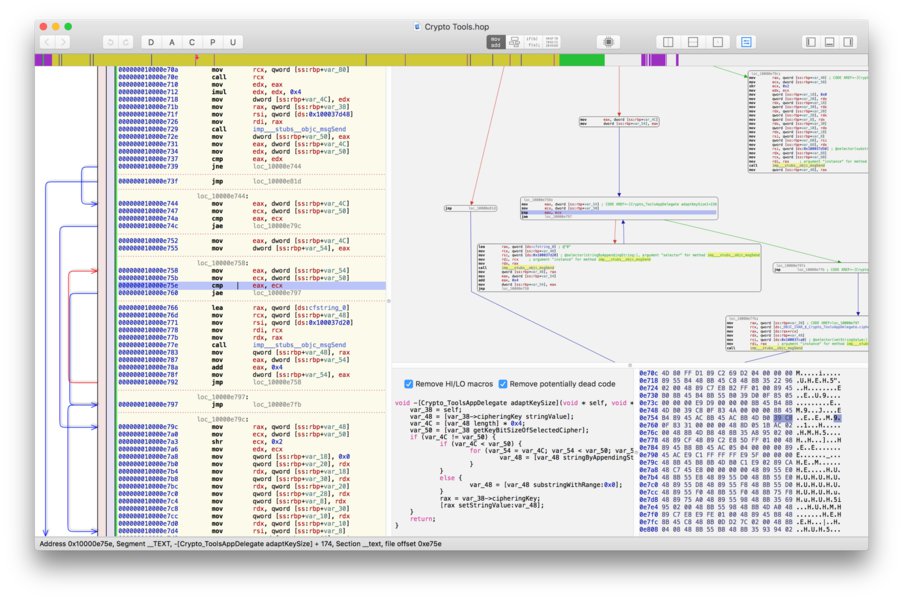
Hopper
If you’re on a budget but you need to reverse native code, instead of IDA you can give Hopper a try. It’s definitely not as good and complete as IDA, but it’s much cheaper and will be good enough for most of the cases.
Hopper supports GNU/Linux and macOS ( no Windows! ) and, just like IDA, has a builtin decompiler which is quite decent considering its price:
Dynamic Analysis
When static analysis is not enough, maybe because the application is obfuscated or the codebase is simply too big and complex to quickly isolate the routines you’re interested into, you need to go dynamic.
Dynamic analysis simply means that you’ll execute the app ( like we did while performing network analysis ) and somehow trace into its execution using different tools, strategies and methods.
Sandboxing
Sandboxing is a black-box dynamic analysis strategy, which means you’re not going to actively trace into the application code ( like you do while debugging ), but you’ll execute the app into some container that will log the most relevant actions for you and will present a report at the end of the execution.
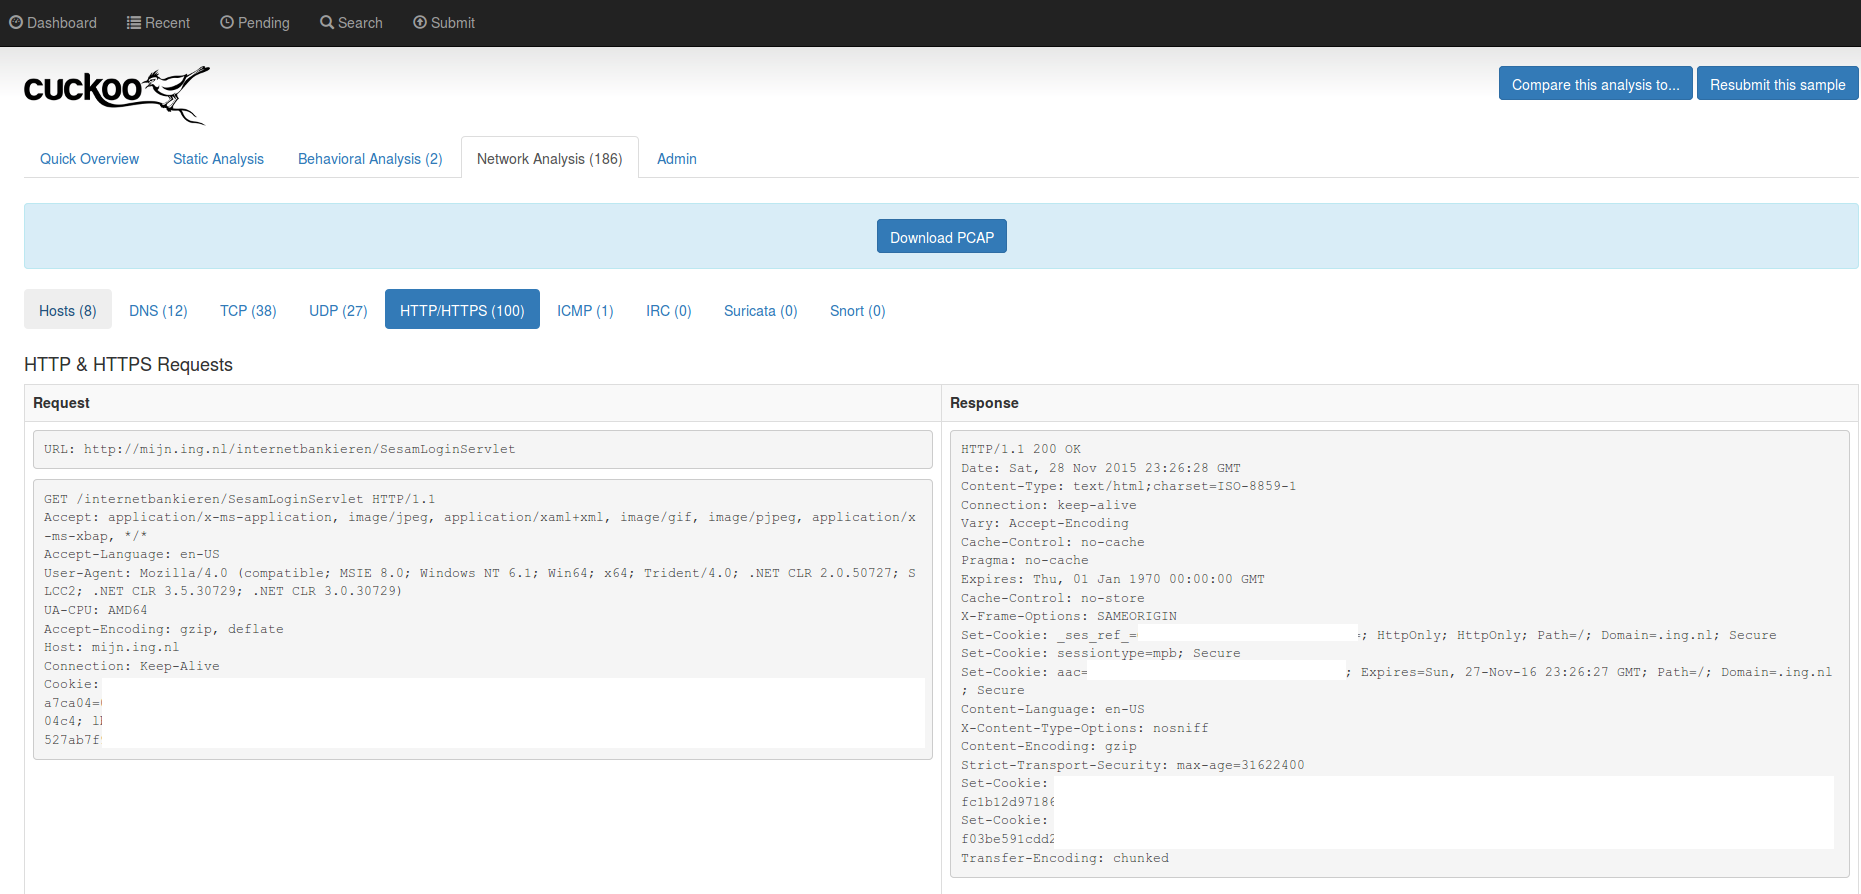
Cuckoo-Droid
Cuckoo-Droid is an Android port of the famous Cuckoo sandbox, once installed and configured, it’ll give you an activity report with all the URLs the app contacted, all the DNS queries, API calls and so forth:
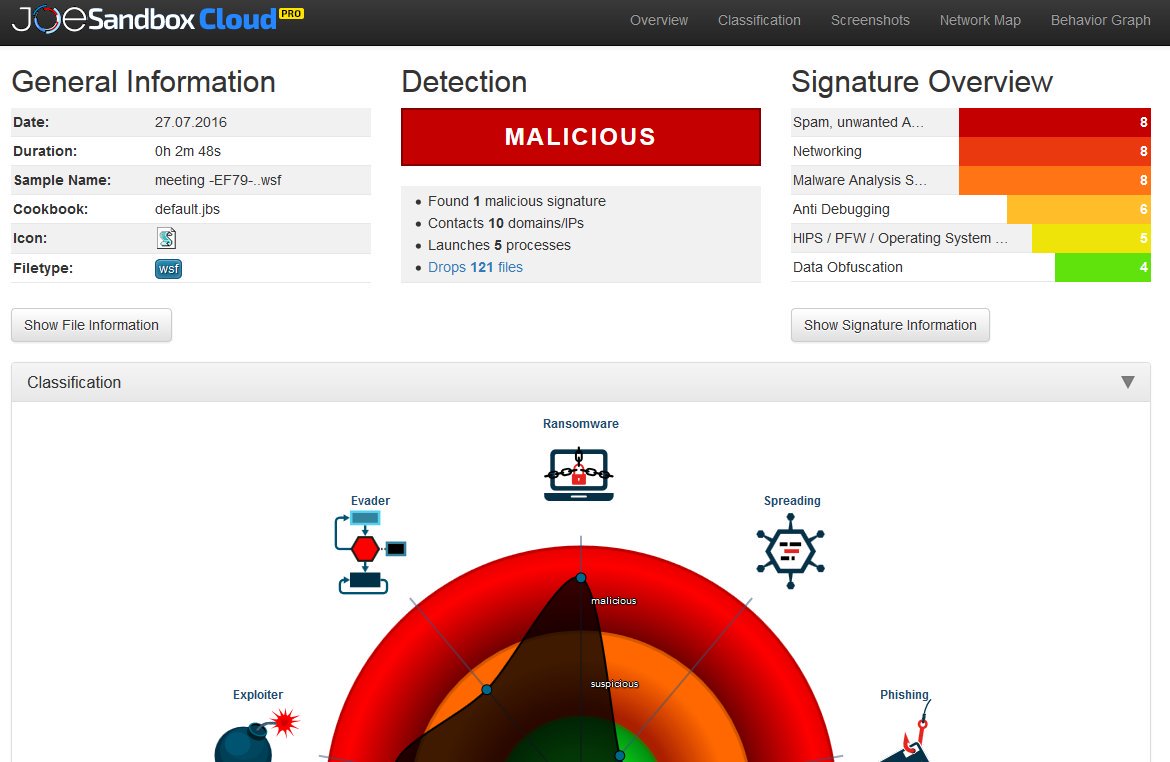
Joe Sandbox
The mobile Joe Sandbox is a great online service that allows you to upload an APK and get its activity report without the hassle of installing or configuring anything.
This is a sample report, as you can see the kind of information is pretty much the same as Cuckoo-Droid, plus there’re a bunch of heuristics being executed in order to behaviourally correlate the sample to other known applications.
Debugging
If sandboxing is not enough and you need to get deeper insights of the application behaviour, you’ll need to debug it. Debugging an app, in case you don’t know, means attaching to the running process with a debugger software, putting breakpoints that will allow you to stop the execution and inspect the memory state and step into code lines one by one in order to follow the execution graph very closely.
Enabling Debug Mode
When an application is compiled and eventually published to the Google Play Store, it’s usually its release build you’re looking at, meaning debugging has been disabled by the developer and you can’t attach to it directly. In order to enable debugging again, we’ll need to use apktool to decompile the app:
apktool d application.apkThen you’ll need to edit the AndroidManifest.xml generated file, adding the android:debuggable="true" attribute to its application XML node:
1 |
|
Once you updated the manifest, let’s rebuild the app:
apktool b -d application_path output.apkNow let’s resign it:
git clone https://github.com/appium/sign
java -jar sign/dist/signapk.jar sign/testkey.x509.pem sign/testkey.pk8 output.apk signed.apk
And reinstall it on the device (make sure you unistalled the original version first):
adb install signed.apkNow you can proceed debugging the app ^_^
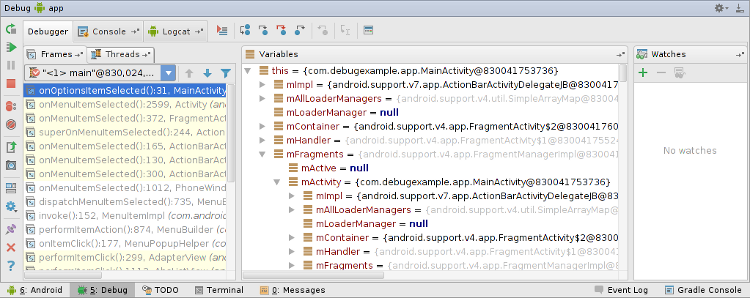
Android Studio
Android Studio is the official Android IDE, once you have debug mode enabled for your app, you can directly attach to it using this IDE and start debugging:
IDA
If you have an IDA license that supports Dalvik debugging, you can attach to a running process and step trough the smali code, this document describes how to do it, but basically the idea is that you upload the ARM debugging server ( a native ARM binary ) on your device, you start it using adb and eventually you start your debugging session from IDA.
Dynamic Instrumentation
Dynamic instrumentation means that you want to modify the application behaviour at runtime and in order to do so you inject some “agent” into the app that you’ll eventually use to instrument it.
You might want to do this in order to make the app bypass some checks ( for instance, if public key pinning is enforced, you might want to disable it with dynamic instrumentation in order to easily inspect the HTTPS traffic ), make it show you information it’s not supposed to show ( unlock “Pro” features, or debug/admin activities ), etc.
Frida
Frida is a great and free tool you can use to inject a whole Javascript engine into a running process on Android, iOS and many other platforms … but why Javascript?
Because once the engine is injected, you can instrument the app in very cool and easy ways like this:
1 | from __future__ import print_function |
In this example, we’re just inspecting some function argument, but there’re hundreds of things you can do with Frida, just RTFM! and use your imagination :D
Here‘s a list of cool Frida resources, enjoy!
XPosed
Another option we have for instrumenting our app is using the XPosed Framework. XPosed is basically an instrumentation layer for the whole Dalvik VM which requires you to to have a rooted phone in order to install it.
From XPosed wiki:
There is a process that is called "Zygote". This is the heart of the Android runtime. Every application is started as a copy ("fork") of it. This process is started by an /init.rc script when the phone is booted. The process start is done with /system/bin/app_process, which loads the needed classes and invokes the initialization methods.

This is where Xposed comes into play. When you install the framework, an extended app_process executable is copied to /system/bin. This extended startup process adds an additional jar to the classpath and calls methods from there at certain places. For instance, just after the VM has been created, even before the main method of Zygote has been called. And inside that method, we are part of Zygote and can act in its context.

The jar is located at /data/data/de.robv.android.xposed.installer/bin/XposedBridge.jar and its source code can be found here. Looking at the class XposedBridge, you can see the main method. This is what I wrote about above, this gets called in the very beginning of the process. Some initializations are done there and also the modules are loaded (I will come back to module loading later).
Once you’ve installed XPosed on your smartphone, you can start developing your own module (again, follow the project wiki), for instance, here’s an example of how you would hook the updateClock method of the SystemUI application in order to instrument it:
1 | package de.robv.android.xposed.mods.tutorial; |
There’re already a lot of user contributed modules you can use, study and modify for your own needs.
Conclusion
I hope you’ll find this reference guide useful for your Android reversing adventures, keep in mind that the most important thing while reversing is not the tool you’re using, but how you use it, so you’ll have to learn how to choose the appropriate tool for your scenario and this is something you can only learn with experience, so enough reading and start reversing! :D